Several versions of the Hurst Competition Plus shifter use a universal shifter mounting plate that locates to the tailhousing by use of a muffler "C" clamp on the tail housing seal area and the two bolts on the transmission mount pad. This is unlike all of the other shifter mount plates that use the shifter mounting holes on the side of the tailhousing. Since most people are buying new shifters to be used with our new transmissions, we have had some concerns that our transmissions are causing fitment issues because our rear seal area is larger in diameter than the factory tail. We are also being blamed for other problems that are in fact Hurst quality issues. You may also want to check out my Hurst Youtube Video for the 1969. It is possible to redrill the 1969 plate with forward holes, but the 1969 plate mounts the whole assembly lower but does in fact use the same part number rods. In defense of the Autogear tailhousing design, I must state that this issue only happens when someone is using an aftermarket shifter with a mounting provision that does not make use of the correct factory mounting location. The complaints usually are:
The first issue is due to the tailhousing design, which a fix is shown in the below pictures. The other problems are quality issues within the Hurst installation kit itself. Since the only answers I got from Hurst were the typical "this is the first time we are hearing about this" combined with "all our parts check correctly to our prints", I figured I'd buy a new shifter and investigate these issues myself. Oddly the online Hurst Knowledge base has a person ask about these same issues. No solution is given other than to read the installation instructions!
|
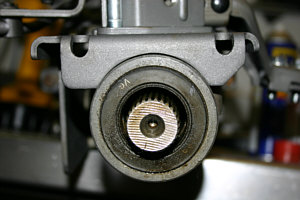 This is how the Hurst bracket fits on a factory tailhousing. The C Clamp can easily fit and lock against the seal area. This bracket also is held in place by the transmission mount. It goes between the mount and case. This raises the transmission higher and can cause a shifter to hit the floor.
 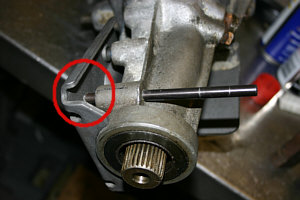 Use a transfer punch on the upper rear mounting hole to locate your new mounting hole. We are going to drill a hole in the plate and eliminate the C clamp.
 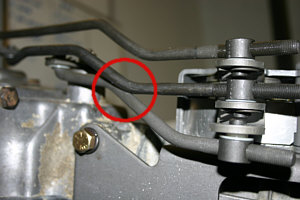 The 1-2 and Reverse Rods rub against one another. Also notice how the Reverse Rod can not line up correctly with the shifter body because the angle is not correct. This is installed on a factory Muncie 4 speed. I've aligned this shifter so I can compare the fit on the new transmission.
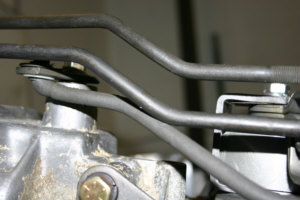 Here is
another view of the problem. Also notice how close the Reverse Arm is to the 1-2 Rod. Since the shifter body pivots on this bracket, certain positions make these conditions worse. I usually heat, bend and grind the Reverse Rod.
Here is
another view of the problem. Also notice how close the Reverse Arm is to the 1-2 Rod. Since the shifter body pivots on this bracket, certain positions make these conditions worse. I usually heat, bend and grind the Reverse Rod. 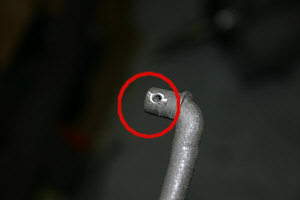 One problem we keep seeing is that the holes for the spring clips are punched leaving sharp edges. These edges will not allow the plastic shifter bushings to slide on the rod. This is a Hurst quality issue. I grind the edges down making them smooth so the rod end doesn't tear up the new bushing.
 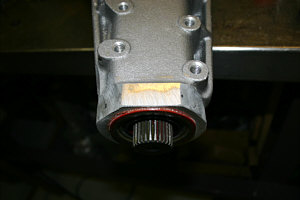 Grind the new Autogear tailhousing as shown. Basically you want to keep grinding it until the plate lines up with the mounting pad holes and is not distorted in any way.
 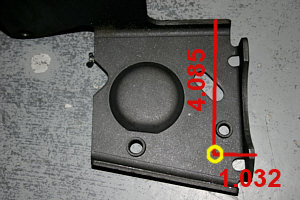 Here are the measurements in inches where the location hole needs to be drilled in case you don't have an old tail to transfer a hole from.
 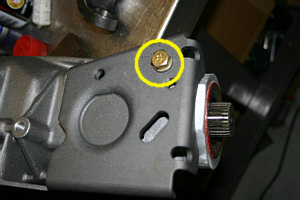 Once the hole is drilled I use a 3/8-16 bolt with a lockwasher. The bolt is 1.25" long. It is also Loctited into the tail. You can also grind more areas off of the seal area to make use of the C Clamp. I don't use the clamp.
 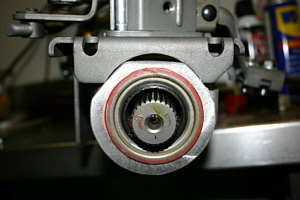 This is how the plate now looks on the new tail. Most people just cut this section off the plate and don't bother grinding the tail. New mount plates from us will be available by late 2015
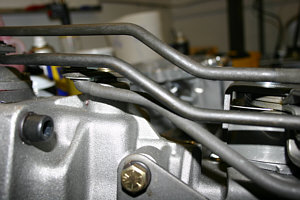 As you can see
the 1-2 and Reverse Rod are still rubbing against one another. The shifter alignment needed no adjustment proving that the new and older transmissions have exactly the same mounting locations and share the same problems.
As you can see
the 1-2 and Reverse Rod are still rubbing against one another. The shifter alignment needed no adjustment proving that the new and older transmissions have exactly the same mounting locations and share the same problems. 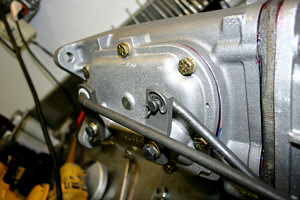 This is the correct position of the 1-2 and 3-4 Arms. The 1-2 arm is not numbered and can easily be mistaken for the 3-4 arm. Notice how the 3-4 Arm bends outward while the 1-2 Arm bends inward. Notice the crappy fit of the spring clips which are no longer locking correctly.